Saturday, 27 February 2016

Continuing with A*

Continuing on from my last post, Further Implementing A*, I have continued to refine its implementation into the game.

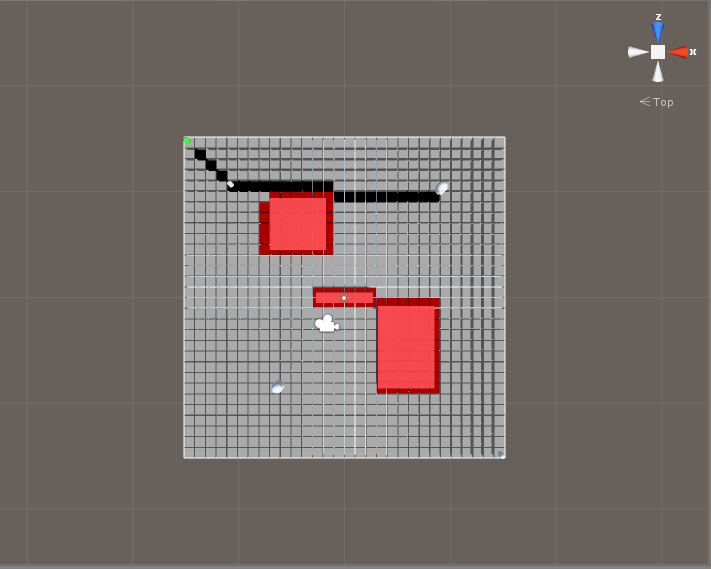
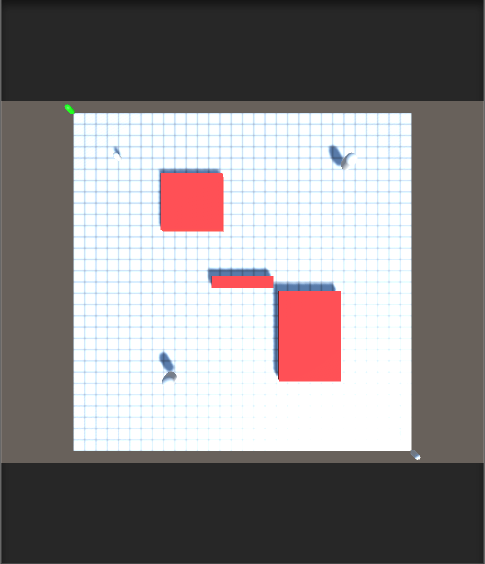
I have now got units following the path given to them, with the path being fixed upon starting movement. The unit will now appear at the end of the path, moving to each position, currently instantaneously, so there is no visual representation of movement displayed. 


Units now have a movement limit. While a path can be drawn across the grid, the unit will only move as many spaces as its move limit allows it to.


I am still having issues with diagonal movement. I believe that I will need to adjust the neighbours being found in the grid class, and the values being assigned for movement in the pathfinding class. While I have looked online for various solutions, e.g. Stack Overflows answers (A star algorithm without diagonal movement) but so far have been unable to find anything that I can grasp and adapt to my current code.


Now that I have the units moving along their given path, I feel I have a couple of choices on how to progress:


  • Continue with the pathfinding
    • Pros
      • Attempt to remove diagonal movement
      • Create visualisation of unit paths and movement
    • Cons
      • Been previously delayed by pathfinding issues, do not want to repeat
      • Could cause further delays in timeline
  • Implement AI
    • Pros
      • Get back on track with timeline
      • Potentially make progress on a personally worrying aspect of the project
      • A fresh aspect of the project to break me away from pathfinding
    • Cons
      • Would need to refine later down the road once weaponry have been implemented
  • Implement weaponry and inventory
    • Pros
      • A fresh aspect of the project to break me away from pathfinding
      • Ready for AI implementation
    • Cons
      • Takes focus away from other key areas of the project
I believe, when broken down, my best bet would be to look towards weaponry implementation now. I add " A fresh aspect of the project to break me away from pathfinding" as a pro, as I believe that if I focus too much time and effort into this singular aspect, a mountain will be made out of a molehill, and I will be less and less inclined to work on the project out of fear/panic. 

By shifting away from pathfinding, even if it's for just one week, I will be able to approach it again from a fresh angle, that will aid me in finalising it. While there are still more Pros leaning towards AI implementation, I feel the extra work that would be required later down the road, to alter the AI to work with weaponry, is completely unneeded extra work. 

Should I implement weaponry now, shifting the Rock-Paper-Scissor system over onto that, I will be able to focus much more heavily on the AI, without having to overhaul it later on. While it does throw off the order of my timeline, I should be able to end up in the same position as I would be following my current order, whereas I worry that AI implementation or continuing pathfinding will delay me further.


Week
Timeline
New Timeline Milestones
15
Refine the RPS system, and introduce weapons that break away from the base system
Implement what I have learnt about A* into the current build of the game, so player units move using the A* pathfinding
16
Refine AI within the game, so they can intelligently attack units based on position and weapon
Ensure that the A* pathfinding is correctly implemented, and look to implementing terrain modifiers within the map
17
Continue to refine AI
Research further and implement AI into the game, ideally with refined goal-seeking mechanics
18
Implement an inventory system, allowing units to equip different weapons, and the use of a health potion item
Ensure the AI is functioning to an optimal level, able to seek out the most efficient target
19
Look into a levelling system, and how this can be implemented
Implement a weapons system to take on the RPS system
20
Implement the levelling system, and start refining stats mechanics
Ensure the weapons system functions correctly, and research into levelling mechanics
Easter Break
Refine the unique support concept, creating a document outlining the mechanic, and its uses
Easter Break
Continue to refine the support mechanic, and start implementation if possible
21
Ensure the AI, movement, levelling, and combat mechanics are operating as desired
Finalise support mechanic implementation, and refine stats for combat mechanics
22
Start looking into a mobile conversion, and implement if possible
Ensure that any map modifiers are functioning correctly, and AI is functioning efficiently
23
Start or continue to implement mobile conversion
Look to start moible conversion
24
Finalise mobile conversion


Saturday, 20 February 2016

Further Implementing A*

Following on from my earlier post; A* Pathfinding, I have now started to implement the A* pathfinding I have learnt into the core of the game, but have reached small snags up to this point.

I have now got a visible grid being instantiated along with the node points, with both node and tile having each other as variables. I have been able to tweak and apply GameManager.cs into the A* build. Units are spawning, and can be moved around the map, as they could with the original pathfinding.

The mouse can now operate as the target position; Once the player starts to move a unit, the target transform will go to any tile moused over, with the path being painted in the scene editor via the use of gizmo's.

One issue so far, is the order of movement. At this time, when a unit goes to move, rather than going from seeker position to target, the unit appears at the target, and moves back to its original position. Rather than following along the path square-by-square, the unit continues to shoot immediately to the destined position. This is one major aspect I believe must be locked down, as it is the biggest impediment at the current time.

As a more minor issue, I am struggling to have the tiles change colour to create a visible path line to the player in the game, rather than just the scene manager.

My next steps will be:

  • Ensure a unit is travelling to the end target
  • The unit moves square by square, instead of travelling as the crow flies
  • Basic visual movement feedback for the player

Monday, 15 February 2016

Basic Design Components

In my rush to start coding my SRPG mission, I overlooked basic design aspects, so, on recommendation from the feedback received for the presentation, I will use this post to outline these aspects, to help create a clearer picture on what exactly the SRPG mission will be.

Set-up
The player is presented with a grid-based map. Two groups of units will be visible; player units, and enemy AI units.

Objective
The objective of the mission is to defeat the enemy team.

Rounds
The player will play through the mission in rounds. In the first round, the player will be able to move and attack with all their units, in any order. Once the player has finished their movement, the AI units will then move and attack. Once the AI has finished, the round will end, and the next round will start. This continues until only one team remains.

Unit Actions
Every unit can move, and attack, on their turn. Between these two actions, the player will also be able to access and use that units inventory only once per turn. Otherwise, the unit will be able to move, and if in position to, attack. Once the attack has been completed, the units turn will end.

Movement
The player will be able to move a unit a number of spaces less than or equals to their movement limit.

Combat
The player will be able to use a unit to attack an enemy unit, once they have moved a unit adjacent.

Stats
Every unit has a collection of stats, that effect their combat capabilities

Strength
Effects the units basic damage output.

Defence
Effects how much damage can be absorbed before health is effected.

Accuracy
Effects the chance of the units hit landing.

Health
How healthy the unit is. If health reaches 0, the unit is dead.

Damage Roll
Effects the units damage output, by essentially rolling an x sided dice to apply bonus damage.

Thursday, 11 February 2016

A* Pathfinding

Following on from my previous post, Moving On, I have started to look into an A* Pathfinding Algorithm. To help me get to grips with it, I have replicated an A* algorithm tutorial from YouTube; Sebastian Lague's first 3 Unity Pathfinding Tutorial videos.
 Through this, I have managed to replicate the A* demonstrated, fully commenting all code used, to show my understanding of what I have replicated.

This has given me a great start into A*, but the code I have replicated will need to be heavily modified, as there are parts of it that do not operate or fit the design envisioned for the final artifact. This will include:

  • Removing any diagonal movement
    • Diagonal movement is rarely to ever seen in SRPGs, so keeping to standard style, I need to remove any diagonal movement, and have the pathfinding working through vertical and horizontal movement
  • Mouse tracks target node
    • Rather than having a target node set for the target position, I intended to have the mouse be able to move among squares, changing the target point. In consideration towards the code already implemented, it may be an idea to have the mouse position set as the seeker, and the unit moving as the target
  • Have a grid matching the nodes
    • I wish to implement the grid style created for the original build of my game, so players can still be given basic visual feedback in the movements and choices.
using UnityEngine;
using System.Collections;
using System.Collections.Generic;
public class Grid : MonoBehaviour {
// Defines how much worldspace the grid is going to cover
public Vector2 worldSize;
// Defines the radius the node covers
public float nodeRadius;
// Defines the diameter of the node; how much area is actually covered by one node
float nodeDiameter;
int gridSizeX, gridSizeY;
// Creates a variable for the layer that terrain objects, the currently unpassable objects, will be set to
public LayerMask terrainMask;
// A 2D array of nodes
Node[,] grid;
void Start() {
// Sets the diameter
nodeDiameter = nodeRadius * 2;
/* Defines how many nodes can be fit into the grid, by taking the lengths of x & y, and dividing it by the nodeDiameter; the size of the node. This is rounded to an integer, ensuring only whole
* nodes are taken into account. */
gridSizeX = Mathf.RoundToInt(worldSize.x / nodeDiameter);
gridSizeY = Mathf.RoundToInt(worldSize.y / nodeDiameter);
// Runs the function to create the node grid
CreateGrid();
}
void CreateGrid(){
// Sets the grid to a new Node array
grid = new Node[gridSizeX, gridSizeY];
// Defines the bottom left corner of the grid
// worldBottomLeft = (0 , 0, 0) - (1, 0, 0) * (30, 0, 0) / 2 - (0 ,0, 1) * (0, 0, 30) / 2;
// This returns the result (-15, 0, -15)
Vector3 worldBottomLeft = transform.position - Vector3.right * worldSize.x / 2 - Vector3.forward * worldSize.y / 2;
// Debug.Log(worldBottomLeft);
// Creates a nested for loop, looking at the first entry in X, that loops through all related Y entries, then moves onto the next X entry
for (int x = 0; x < gridSizeX; x++) {
for (int y = 0; y < gridSizeX; y++) {
// worldPoint = (-15, 0, -15) + (1, 0, 0) * ( (1 * 1 + 0.5) + (0, 0, 1) * (1 * 1 + 0.5);
// This function is used to work out at which point in the world the node is going to be placed, with the x and y values being used to push the world point around the grid
Vector3 worldPoint = worldBottomLeft + Vector3.right * (x * nodeDiameter + nodeRadius) + Vector3.forward * (y * nodeDiameter + nodeRadius);
/* This checks what status the walkable bool on the node should be. A sphere is created around the current node worldpoint, using the radius as the sphere radius, that looks to see if it is
* colliding with anything attached to the terrainMask layer. If false, the node is walkable. */
bool walkable = !(Physics.CheckSphere(worldPoint, nodeRadius, terrainMask));
/* The node is pushed into the grid at the position, with the walkable bool being set, the nodes worldpoint, and its x and y positions on the grid being set through its position in the loops
* defined by x and y. */
grid[x, y] = new Node(walkable, worldPoint, x,y);
}
}
}
// A method that returns a list of nodes that surround the current node
public List<Node> GetNeighbours(Node node) {
// Set the list as a new list
List<Node> neighbours = new List<Node>();
// Creates a loop that looks in a 3x3 area around the current node
for (int x = -1; x <= 1; x++) {
for(int y = -1; y <= 1; y++) {
// This if statement skips over the centre node, as that is the current node
if (x == 0 && y == 0)
continue;
// Creates 2 integers, that start in the bottom left node in the 3x3 grid, working upwards in columns, then across, due to the for loops
int checkX = node.gridX + x;
int checkY = node.gridY + y;
// Ensure that the node is on the grid correctly, then adds it to the neighbours list
if(checkX >= 0 && checkX < gridSizeX && checkY >= 0 && checkY < gridSizeY) {
neighbours.Add(grid[checkX, checkY]);
}
}
}
// Returns the list once the loop is complete
return neighbours;
}
// Method that converts the world position of a node to a grid position
public Node NodeFromWorldPoint(Vector3 worldPos) {
// Works out how far along the axis a node is, with 0 for far left/bottom, .5 for middle, 1 for far right/top, and converts them into a percentage
// Takes in the position of the node through worldPos
// percentX is equal to the x position of the node, plus the total x size of the grid, divided by 2, all divided by the x size of the grid
// ((-15, 0, 0) + (30, 0, 0) / 2) / (30, 0, 0) = 0 / 30 = 0;
float percentX = (worldPos.x + worldSize.x / 2) / worldSize.x;
float percentY = (worldPos.z + worldSize.y / 2) / worldSize.y;
// Ensures the values are always between 0 and 1, so if a seeker/target is off the grid, the values do not error
percentX = Mathf.Clamp01(percentX);
percentY = Mathf.Clamp01(percentY);
/* Gets the x and y of the grid array. The gridSize's are taken, with minus 1, due to arrays starting at 0, and are multiplied by the percent worked out above. These are rounded to integers, to work
* with the array */
int x = Mathf.RoundToInt((gridSizeX - 1) * percentX);
int y = Mathf.RoundToInt((gridSizeY - 1) * percentY);
// This returns the node to the grid with x and y set
return grid[x, y];
}
public List<Node> path;
// Gizmos are used to aid in the scene development side, not showing in the actual game. OnDrawGizmos is a function within MonoBehaviour, that applies any gizmos created to the scene
void OnDrawGizmos() {
// The first gizmo is a wire cube, that shows the area being covered by the grid. As the worldSize is altered in the inspector, the wire cube gizmo alters with it
Gizmos.DrawWireCube(transform.position, new Vector3(worldSize.x, 1, worldSize.y));
/* This if statement first looks to make sure there is something within the grid array. If true, a foreach loop is started, looking at every node in the grid. Depending on if the node is walkable
* or not, the colour of the node will change. If there is a path formed between the seeker transform and target transform, that path will be coloured black. Once the colours have been defined,
* the cubes are drawn into the scene editor. */
if(grid != null) {
foreach(Node n in grid) {
Gizmos.color = (n.walkable) ? Color.white : Color.red;
if (path != null)
if (path.Contains(n))
Gizmos.color = Color.black;
Gizmos.DrawCube(n.worldPos, Vector3.one * (nodeDiameter - .1f));
}
}
}
}
view raw Grid.cs hosted with ❤ by GitHub
using UnityEngine;
using System.Collections;
public class Node {
// Declares if the node can be walked through or not
public bool walkable;
public Vector3 worldPos;
// The distance from the starting node
public int gCost;
// The distance to the target node
public int hCost;
// Allows the node to know its own location on the 2D array
public int gridX;
public int gridY;
public Node parent;
// Assigns the values of the node to the class
public Node(bool _walkable, Vector3 _worldPos, int _gridX, int _gridY) {
walkable = _walkable;
worldPos = _worldPos;
gridX = _gridX;
gridY = _gridY;
}
// The total cost of a node. This will never be set, as it is worked out through the calculations of gCost + hCost
public int fCost {
get {
return gCost + hCost;
}
}
}
view raw Node.cs hosted with ❤ by GitHub
using UnityEngine;
using System.Collections;
using System.Collections.Generic;
public class Pathfinding : MonoBehaviour {
// Reference to the grid class
Grid grid;
public Transform seeker, target;
void Awake() {
// Sets the grid variable to the Grid class attached to the same gameObject
grid = GetComponent<Grid>();
}
void Update()
{
// Finds the path between the seeker position and target position
FindPath(seeker.position, target.position);
Debug.Log(seeker.position);
}
// The method that finds the path between a starting position, and an end position
void FindPath(Vector3 startPos, Vector3 targetPos) {
// Stores 2 nodes in the method as the starting and end position, from the nodes input at the beginning of the method
Node startNode = grid.NodeFromWorldPoint(startPos);
Node targetNode = grid.NodeFromWorldPoint(targetPos);
/* Creates a list to contain open nodes, those that have not yet been evaluated, and a HashSet to contain nodes that have already been evaluated. A list is used for the open data, as this will be
* be the container that is searched the most, allowing for a more efficient search. A hashSet is used for the closed data, as this is rarely looked upon or changed once a node is entered, other than
* to ensure that a unique entry is already in there. */
// Information obtained from http://geekswithblogs.net/BlackRabbitCoder/archive/2011/06/16/c.net-fundamentals-choosing-the-right-collection-class.aspx
List<Node> openSet = new List<Node>();
HashSet<Node> closedSet = new HashSet<Node>();
// The first node is added to the open data, ensuring the count is above 0 and the loop starts
openSet.Add(startNode);
// This is the loop that determines the best path to take
while (openSet.Count > 0) {
// The variable currentNode is set to the first entry of the openSet
Node currentNode = openSet[0];
// A for loop starts, going through the entries in the open data
for (int i = 1; i < openSet.Count; i++) {
/* if the node i total cost (fCost) is less than the current node fCost, or the node i fCost is equal to the current node fCost & node i's distance to target (hCost) is less than the
* current nodes, the current node becomes node i. */
if (openSet[i].fCost < currentNode.fCost || openSet[i].fCost == currentNode.fCost && openSet[i].hCost < currentNode.hCost) {
currentNode = openSet[i];
}
}
// Removes the current node from the open data to the closed data
openSet.Remove(currentNode);
closedSet.Add(currentNode);
// If the path is complete, leave the loop
if(currentNode == targetNode) {
RetracePath(startNode, targetNode);
return;
}
// This loop goes through all the nodes in the GetNeighbours list in the Grid class, for the current node
foreach (Node n in grid.GetNeighbours(currentNode)) {
// If the neighbour is not walkable, or already closed data, the loop continues
if(!n.walkable || closedSet.Contains(n)) {
continue;
}
// This integer is distance cost from the neighbour node (n). The cost of the current node is added to the distance between it and the neighbour
int newCostToN = currentNode.gCost + GetDistance(currentNode, n);
// If the new distance cost is less than the neighbours old cost, or the neighbour node is not in the open data
if(newCostToN < n.gCost || !openSet.Contains(n)) {
// New variables are set for the neighbour, with both a new gCost and hCost being set, the hCost checked through the GetDistance method, and the current node is made its parent node
n.gCost = newCostToN;
n.hCost = GetDistance(n, targetNode);
n.parent = currentNode;
// If the neighbour is not in the open data, it is added
if (!openSet.Contains(n))
openSet.Add(n);
}
}
}
}
// Builds a path from the target node
void RetracePath(Node startN, Node endN) {
// The nodes that will be travelled along
List<Node> path = new List<Node>();
// Sets the target node as the current node
Node currentN = endN;
// A loop that runs until the current node is the starting node, adding the current node to the path list, then looks to the parent of that node for the shortest path, and sets it as the current node
while (currentN != startN)
{
path.Add(currentN);
currentN = currentN.parent;
}
// Sets the order of the path list to be in the correct order, from start node to end node
path.Reverse();
//Pushes the path list to the path list in the Grid class
grid.path = path;
}
// Gets the current distance between 2 nodes
int GetDistance(Node nodeA, Node nodeB) {
// Creates 2 integers that work out the distance for both x and y axis between nodeA and nodeB, ensuring they're absolute
int dstX = Mathf.Abs(nodeA.gridX - nodeB.gridX);
int dstY = Mathf.Abs(nodeA.gridY - nodeB.gridY);
// if dstX is greater than dstY, using 14y + 10, multiplied by (dstX - dstY)
/* NodeA = (5, 4). NodeB = (4, 7). dstX = 1. dstY = -3
* 1 > -3
* return (14 * -3 =)-42 + (10 * (1 - -3 =)4)
* -42 + 40 = -2
*
* The shortest distance is taken into account first, moving diagonally towards as represented by the cost of 14. The cost of vertical/horizontal movements is worked out next, by taking the standard
* cost of 10, and applying it to however many spaces are left once the lowest distance is subtracted from the highest, as diagonal movement reduces the amount of distance between them. */
if (dstX > dstY)
return 14 * dstY + 10 * (dstX - dstY);
return 14 * dstX + 10 * (dstY - dstX);
}
}
view raw Pathfinding.cs hosted with ❤ by GitHub
Along with this, I have now had my presentation to explain to lecturers where I am with the project. Following this, I have been recommended to go back to the design, and outline the basic components of my game, e.g. defining what a turn is. This will be my next major step, before pushing onto the A* implementation.


Friday, 5 February 2016

Moving On

On Thursday 4th February, I had a meeting with one of my lecturers, Chris Jane, to discuss the issues I've had with movement, and about the upcoming presentation that will be presented on Monday 8th February. This presentation will be an update of my work to the lecturers of the course. I will discuss what has gone well the project so far, what has gone awry, and what my next steps should be.

While I had intended to overcome the foreach loop I was struggling with, as mentioned in my last post, Further Movement Issues, and wrap up basic AI, I was recommended to move past those, and start implementing the A* Pathfinding Algorithm into my project. While I did some light research into into it at the beginning of the project, I still have yet to wrap my head fully around it.

My next step will be to conduct further research into A* Pathfinding, and attempt to grasp the basics of it. This will hopefully be implemented into the project with a couple of weeks at the most. Following this, I will prepare for my presentation, which will include a revised timeline for the project, as I feel there are aspects of the project that were not prioritized correctly, and as I have fallen behind by a couple weeks, will need to be re-ordered.